Table of Contents
- The Foundation: Why Positioning is Paramount
- The Standard Formation: Your Bread and Butter
- Advanced Formations: Creating a Strategic Advantage
- The Engine Room: Communication That Wins Matches
- Conclusion: Becoming a Cohesive Unit
You’ve mastered the third shot drop. Your dink game is patient and precise. You can drive the ball with pace when the opportunity arises. You’ve graduated from a beginner to a competent pickleball player. So, what separates you from the teams that consistently dominate the court, the ones who seem to move as one fluid unit, anticipating every shot and always being in the right place at the right time?
The answer, more often than not, lies beyond individual skill. It’s found in the sophisticated interplay of strategy, positioning, and constant dialogue. High-level doubles pickleball is a game of chess on a small court, and the two most powerful pieces at your disposal are formations and communication.
Whether you’re battling it out under the intense Malaysian sun at a club in Petaling Jaya or playing in a fast-paced indoor league, understanding the “why” behind where you stand and the “what” behind what you say to your partner will elevate your game from good to formidable. This guide will provide a detailed breakdown of the formations and communication strategies that win points, matches, and tournaments.
The Foundation: Why Positioning is Paramount
Before we dive into specific formations, let’s establish a core principle: The primary goal of any formation is to maximize court coverage and control the Non-Volley Zone (NVZ), or “kitchen” line. A team that establishes and maintains its position at the NVZ wins the point over 80% of the time. Every formation, every switch, and every strategic move is designed to get your team to the kitchen line and keep your opponents back.
Your positioning dictates your ability to apply pressure, defend effectively, and create offensive opportunities. Poor positioning leaves gaping holes for your opponents to exploit, while smart positioning forces them into making low-percentage shots.
The Golden Rule of the Middle
In doubles, the area down the middle of the court is both the most common target and the source of the most confusion. A simple geometric reality is that the net is lowest in the middle, and shots directed here create uncertainty between partners. Therefore, a fundamental aspect of any formation is a clear understanding of who is responsible for the middle. The general rule of thumb is: The player with the forehand in the middle takes the shot. This is because the forehand is typically a stronger, more offensive stroke for most players.
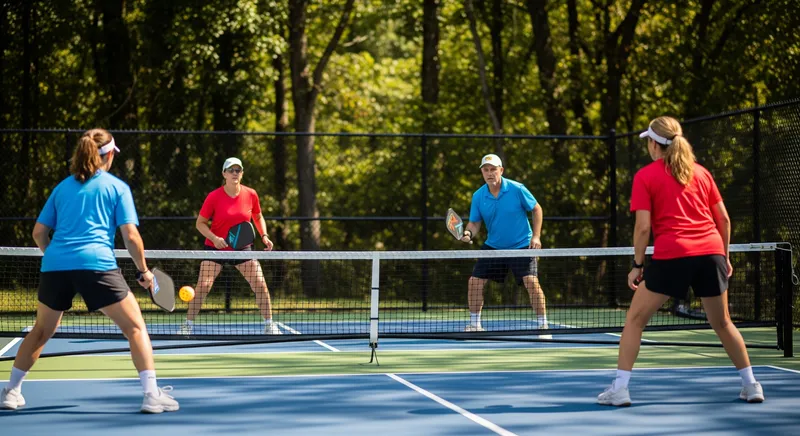
The Standard Formation: Your Bread and Butter
For 90% of your playing time, you’ll be in the standard doubles formation. Mastering this is non-negotiable before you even consider more advanced tactics.
At the NVZ Line:
You and your partner stand side-by-side at the kitchen line, about an arm’s length and a paddle’s length away from the sideline. Your weight should be on the balls of your feet, paddle up and ready.
- Player on the Right (Odd Court): Your primary responsibility is your half of the court, but your backhand covers the middle.
- Player on the Left (Even Court): Your primary responsibility is your half, but your forehand covers the middle. Following the “forehand takes the middle” rule, you should be prepared to take the majority of shots that come down the centre.
On Serve and Return of Serve:
This is the only time partners are not side-by-side.
- Serving Team: The server stands deep, just behind the baseline. Their partner stands at the NVZ line on their side of the court. The goal of the serving team is to hit a good third shot (ideally a drop into the kitchen) and join their partner at the NVZ as quickly as possible.
- Returning Team: The returner stands back, ready to hit a deep return of serve. Their partner is already positioned at the NVZ line, looking to pick off any weak third shots. After hitting the return, the returner’s primary goal is to sprint to their position at the kitchen line.
This standard formation is your default. It’s stable, provides excellent court coverage, and is easy to maintain. However, to gain a true competitive edge, you need to know when and how to deploy more advanced formations.
Advanced Formations: Creating a Strategic Advantage
Advanced formations are not meant to be used on every point. They are strategic plays designed to exploit an opponent’s weakness, optimize your team’s strengths, or create confusion and disruption.
1. Stacking: Optimizing Strengths
Stacking is the most common advanced formation. It’s a method of positioning that allows players to be on the side of the court that best suits their forehand or backhand, regardless of who is serving or returning.
- Why Stack?
- Forehand Dominance: The most common reason is to ensure the partner with the stronger forehand is always on the left side (for right-handed players), allowing them to cover the middle with their best shot.
- Lefty/Righty Combos: Stacking is almost essential for lefty/righty teams. It allows both players to keep their powerful forehands in the middle, creating a formidable offensive wall.
- Protecting a Weakness: If one partner has a particularly weak backhand, stacking can be used to keep them on the side where they can hit more forehands.
- Creating Confusion: A team that stacks effectively can be unpredictable and difficult for opponents to read.
- How to Stack (Example: Stacking to keep Player A on the left side):
- On Your Serve:
- If Player A is serving from the right (odd) court, they will serve as normal. Immediately after the serve, they will run diagonally left to their preferred left-side position.
- Player B, who started at the NVZ on the left (even) side, will slide across to the right side to cover the open court. The switch happens after the serve is struck.
- On Your Return:
- If Player A is supposed to receive on the right (odd) court, they will stand near the centre line. Player B will stand out of bounds next to the left (even) court.
- Player A hits the return (usually cross-court to allow more time) and immediately moves to the left side of the court at the NVZ.
- Player B quickly steps in to occupy the right side of the court at the NVZ.
- On Your Serve:
Stacking requires practice and non-verbal cues. Before the point, partners should confirm the stack with a quick signal (like a fist behind the back).
2. The I-Formation: Aggressive Poaching
The I-Formation (or Tandem Formation) is a hyper-aggressive play used on the return of serve to disrupt the serving team’s crucial third shot.
- What it Looks Like: The returning player is deep as normal. However, their partner is not positioned at the NVZ on their side of the court. Instead, they are crouched down near the centre T of the NVZ line, directly in front of their partner. This creates a single-file “I” shape.
- Why Use the I-Formation?
- The goal is for the player at the net to poach (intercept) a weak or predictable third shot from the serving team.
- It creates immense mental pressure. The serving team sees the I-Formation and knows their third shot must be perfect, often forcing an error.
- It sows confusion and breaks the rhythm of the game.
- How to Execute It:
- The Signal: The net player gives a signal (e.g., hand pointing left or right) to the returning partner, indicating which way they intend to poach.
- The Return: The returning player’s job is to hit a deep, solid return, giving their poaching partner time to move and react. A short return will result in the net player getting burned.
- The Poach: As the opponent strikes their third shot, the net player explodes in the signalled direction to cut off the ball and hit an aggressive volley for a winner.
- The Cover: The returning player, after hitting their return, moves to cover the open side of the court abandoned by their poaching partner.
The I-Formation is a high-risk, high-reward play. When it works, it’s a huge momentum shifter. When it fails, it can leave a wide-open court.
3. Dynamic Switching: In-Rally Adaptation
Switching is not a pre-set formation but a dynamic reaction to being pulled out of position during a rally. It is a hallmark of truly advanced teams.
- The Trigger: A switch is triggered when one player is pulled far wide to retrieve a shot, leaving a massive gap in the middle of the court. For instance, your partner is pulled way off the right side of the court to hit a defensive backhand.
- The Execution:
- The moment you see your partner pulled wide, you must slide over to cover the middle and a portion of their now-vacant side. You are essentially defending 75% of the court for a moment.
- The player who was pulled wide does not scramble back to their original position. Instead, they recover to the nearest open space on the court, which is now the side their partner just left.
- This requires a loud, clear call of “Switch!” from the partner who initiates the cover.
Mastering the switch prevents your opponents from winning easy points by simply hitting into the open court. It demonstrates court awareness and trust in your partner.
The Engine Room: Communication That Wins Matches
You can have perfect formations, but without communication, they will crumble. Communication is the engine that drives every successful doubles team. It should be constant, clear, and constructive.
Pre-Point Communication
This is silent communication. Before serving or returning, use hand signals behind your back to confirm your strategy for the point.
- Closed Fist: Standard formation, no special play.
- One Finger Pointing Left/Right: Signal for a stacking shift.
- Wiggle Fingers: Signal for an I-Formation poach.
In-Rally Communication
This needs to be short, sharp, and decisive. There’s no time for sentences.
- “You!” or “Yours!”: Shouted when a ball is clearly your partner’s. This eliminates hesitation.
- “Me!” or “Mine!”: Taking ownership of a middle ball. The “forehand takes it” rule is great, but a verbal call is even better.
- “Switch!”: The essential call for a dynamic in-rally switch.
- “Bounce!” or “Out!”: Yell this when you are certain a ball is heading out of bounds. This is crucial for preventing your partner from hitting a ball they shouldn’t. This requires a lot of trust.
- “Up!” / “Back!”: Positional commands. If you see your partner has drifted too far back, a quick “Up!” can remind them to regain their position at the NVZ.
- No call on a middle ball implies it’s your partner’s. The player whose forehand is in the middle should be prepared to hit it unless they hear “You!”
Post-Point Communication
This is the quick 5-second debrief.
- Touch paddles. Always. It reinforces partnership.
- Keep it positive and constructive. “Great get!” or “Good idea on that shot.”
- If there was an error, quickly diagnose it. “My fault, I was too slow getting up,” or “Next time, let’s try a cross-court dink there.” Don’t place blame; solve the problem for the next point.
Conclusion: Becoming a Cohesive Unit
Mastering doubles strategy is a journey. It begins with a solid understanding of the standard formation and the fundamental goal of controlling the kitchen. From there, you and your partner can begin to experiment with advanced formations like stacking and the I-Formation, understanding when and why to use them.
But above all, you must commit to constant and effective communication. Formations tell you where to be; communication ensures you and your partner get there together. It transforms two individuals playing next to each other into a true, formidable doubles team.
So take these concepts to the court. Practice them. Drill them. Talk about them with your partner. Be patient when they fail and celebrate when they work. The teams that win consistently are not always the ones with the flashiest shots; they are the ones with the smartest strategy and the strongest partnership.
Leave a Reply